


LFW Dataset: Basic Usage and a Quick Tutorial

What Is Labeled Faces in the Wild (LFW)?
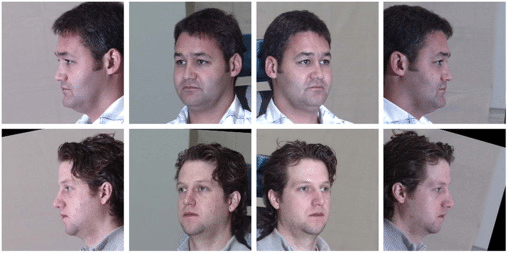
Labeled Faces in the Wild (LFW) is an image dataset containing face photographs, collected especially for studying the problem of unconstrained face recognition. It includes over 13,000 images of faces collected from across the web. Here are key aspects of these images:
Each face in this data set was labeled with the person’s name in the image.
1680 of the photographed persons distinctly appear in two or more photos in the data set.
The faces in these images were detected by the Viola-Jones face detector (Paul Viola and Michael Jones, 2001).
LFW includes four different sets of images, including the original and three types of aligned images that can be used to test algorithms under different conditions. For alignment, the dataset uses funneled images (ICCV 2007), LFW-a, and deep funneled images (NIPS 2012). Deep funneled and LFW-a images produce superior results for most face verification algorithms over the funneled images and the original images.
In This Article
Downloading the LFW Dataset
The LFW dataset contains 11 files, with the lfw-deepfunneled.zip file holding the images. The remaining files contain relevant metadata to help create training or testing sets. The following two sections may help you better navigate these files.
Image Metadata
The information about images includes the image file format and dimensions. Images are available in jpg format. For example, the third Angelina Jolie image is lfw/AngelinaJolie/AngelinaJolie0003.jpg. All images are 250×250, with the OpenCV Viola-Jones face detector implementation used to detect and center them. The cropped regions are automatically enlarged by a factor of 2.2.
Metadata Information
Information about the attached metadata includes lfwallnames.csv and lfwreadme.csv. The first file lists the names and number of images for each identity in the dataset. In contrast, the second is a comprehensive readme file from the original database, providing most information and additional resources. It describes the use of all .csv files to build training and testing models and provides column metadata.
The two configurations for building training and testing sets are pairs and people. The first option uses files such as pairs.csv (randomly-generated splits for cross-validation for pairs), matchpairsDevTest.csv (500 face pairs), matchpairsDevTrain.csv (1100 face pairs), mismatchpairsDevTest.csv (500 mismatched face pairs), and mismatchpairsDevTrain.csv (1100 mismatched face pairs).
The second configuration uses files such as people.csv (randomly-generated splits for cross-validation for individual faces), peopleDevTest.csv (3708 images for 1711 individuals), and peopleDevTrain.csv (9525 images for 4038 individuals).

Basic Usage of LFW with Scikit Learn
The LFW dataset is 200 MB in size and can take a few minutes to be converted to numpy arrays. To reduce loading times, after you load the model for the first time, use the memmapped version in the ~/scikit_learn_data/lfw_home/ folder using the joblib utility.
LFW has two loaders: fetch_lfw_people, used for face identification, and fetch_lfw_pairs, used for face verification. Code examples below are taken from the scikit-learn documentation.
Using fetch_lfw_people Loader
This loader is used to perform face identification—classifying faces into multiple classes via supervised learning. Below is an example showing how to import the LFW dataset and show the names of the celebrities in the images.
Keep in mind that the default data slice shows each image cropped around the face in a rectangular shape.
>>> from sklearn.datasets import fetch_lfw_people
>>> lfw_people = fetch_lfw_people(min_faces_per_person=70, resize=0.4)
>>> for name in lfw_people.target_names:
… print(name)
…
Ariel Sharon
Colin Powell
Donald Rumsfeld
George W Bush
Gerhard Schroeder
Hugo Chavez
Tony Blair
There are 1140 faces in the dataset, each one is assigned to a single person id in the target array. Here is how to use this array to access ground truth data.
>>> lfw_people.target.shape
(1288,)
>>> list(lfw_people.target[:10])
[5, 6, 3, 1, 0, 1, 3, 4, 3, 0]
Using fetch_lfw_pairs Loader
This loader can be used for face verification—determining if a pair of two pictures does or does not belong to the same person. The dataset is divided into three subsets:
- train—used for algorithm development.
- test—used to evaluate face recognition algorithms.
- 10_folds—lets you evaluate performance metrics using 10-fold cross validation.
Here is how to import LFW data using this loader and list the available pairs of face images.
>>> from sklearn.datasets import fetch_lfw_pairs
>>> lfw_pairs_train = fetch_lfw_pairs(subset=’train’)
>>> list(lfw_pairs_train.target_names)
[‘Different persons’, ‘Same person’]
Obtaining RGB Colors
For both loaders above, you can get another dimension for the database showing the RGB color channels. To get this additional data, use the flag color=True. The output will look like this:
(2200, 2, 62, 47, 3)
Quick Tutorial: Face Detection Using CNN With the LFW Dataset
This tutorial is based on a detailed Kaggle notebook shared by Jake Barrett. It shows how to import the LFW dataset, split it into training and testing sets, create a simple CNN model that identifies one individual in dataset images, and then a more complex model that can identify images showing six different individuals.
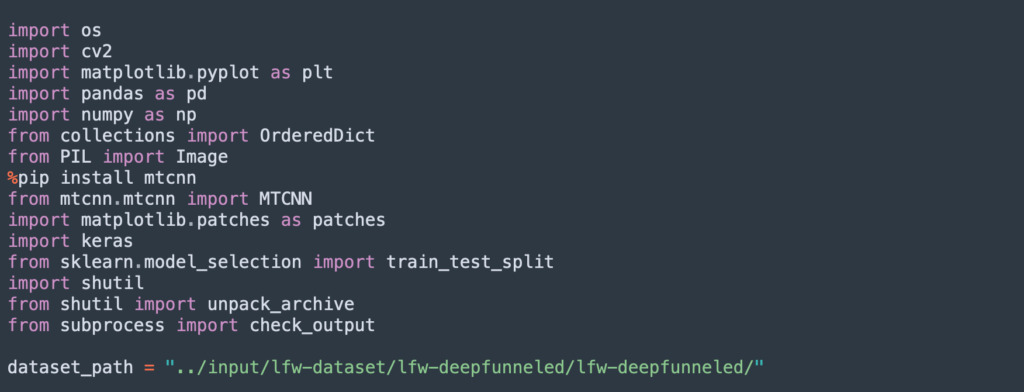
Step 1: Installing Libraries and Importing LFW Dataset
The following code installs the required libraries and imports the raw LFW data:
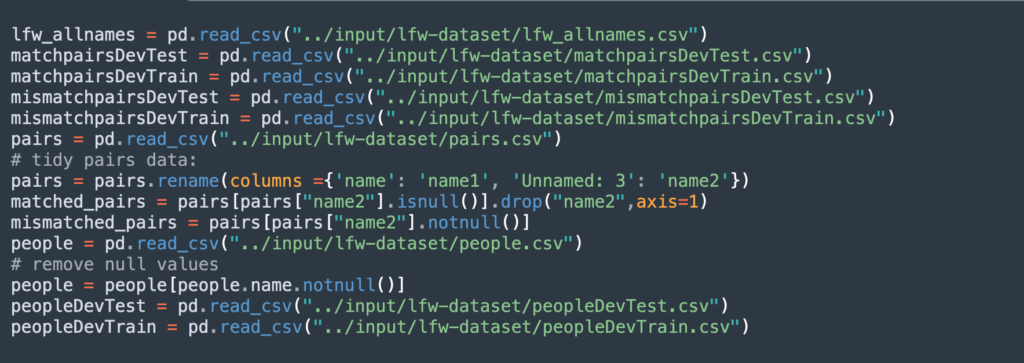
This code cleans the data and prepares it for training:
Step 2: Splitting Data into Training and Test
The following code splits the dataset into:
- A training set that can show a model how to predict the names associated with images, and learn how to deal with the same face in different situations.
- A testing set that can evaluate the model’s ability to predict identity for an image. The test set needs to include individuals that were seen in the training set—but not the same images of those individuals.
This code can generate a suitable training and testing set. The testing set is a random sample of 80% of the data:
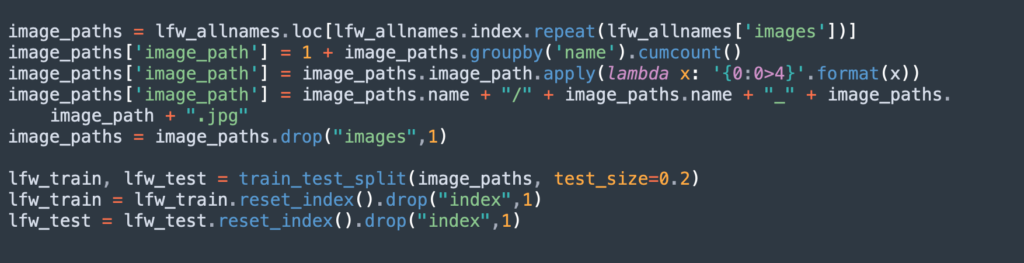
This code ensures that the testing set has a mix of seen and unseen individuals:

Step 3: Building Basic CNN Model to Recognize One Individual
Here is a classic CNN architecture that can be used to identify the identity of one individual on images from the dataset. The CNN makes a binary prediction: whether the image does or does not show a specific person.
The following code creates a CNN architecture that can identify the most well-sampled individual in the dataset: George W Bush. The CNN architecture used has one 2D convolutional layer followed by one pooling layer, and a dense neural network to generate the final prediction.
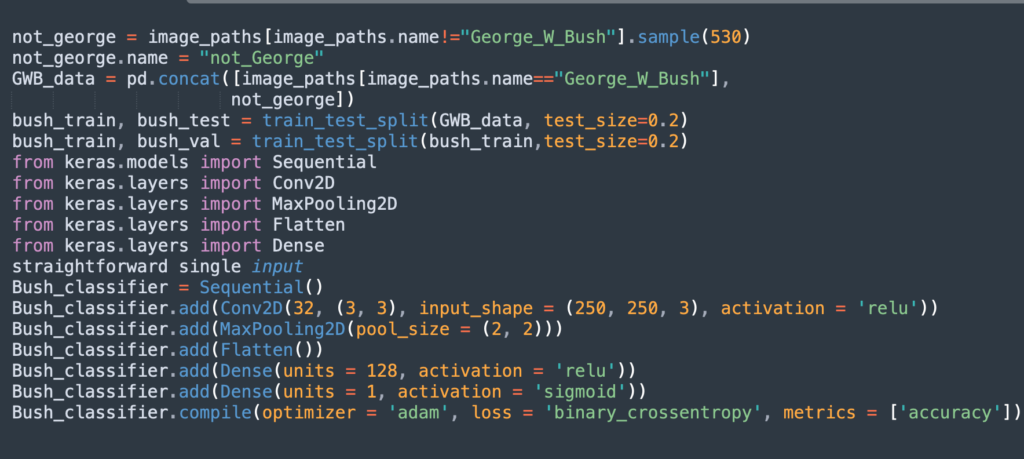
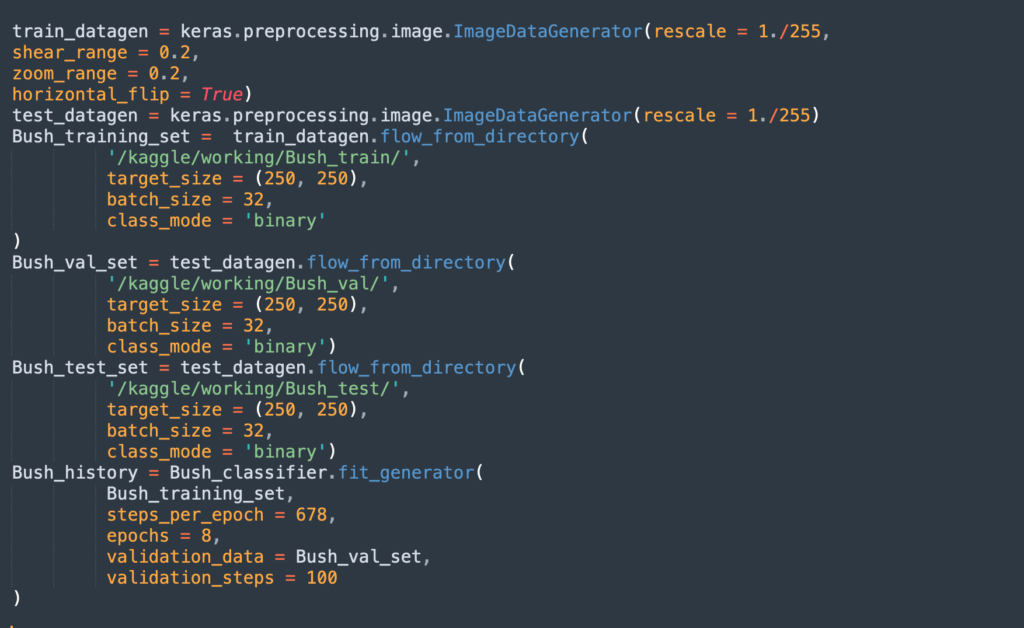
Here is how to run the algorithm, assuming that all the images are in the correct training/test folders:
Step 4: Extending the Model to Multiple Classes
Here is how to extend the CNN model shown above to identify the six most frequently occuring celebrities in the dataset. To create balanced classes and allow the algorithm to run faster, the following code down-samples each of these individuals to 75 samples:

The following code runs the previous model, adjusted to process multiple classes:
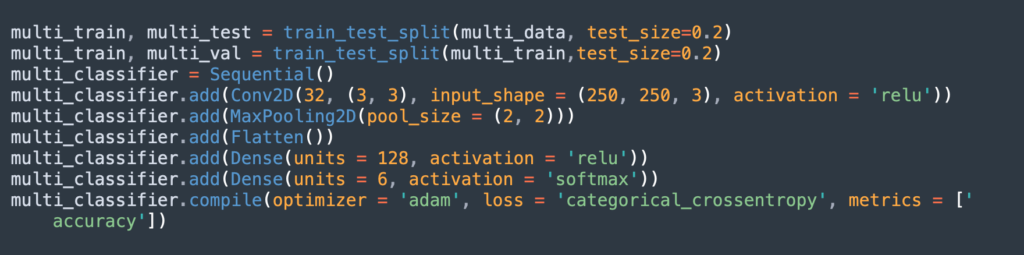
Finally, here is how to train the multi-class model:
Get our free eBook
How to use synthetic data in 6 easy steps

Read More
The State of Facial Recognition Today
Procedural Humans for Computer Vision